- 魔方从零开始VS2022+NET8+MVC[202401]
- 魔方从零开始VS2022+NET8+MVC[202402]
- 如果没有同步过来,请在这里查看完整内容:快速开发平台魔方Cube
魔方从零开始VS2022+NET8+MVC
本教程中的代码(拉取后直接运行即可):https://github.com/landv/DotNet.NewLife.Cube
初始化
- 魔方源码库地址:https://github.com/NewLifeX/NewLife.Cube
- XCode源码库地址: https://github.com/NewLifeX/NewLife.XCode (需要使用xcodetool.exe 这个工具来动态生成代码以及自动建表)
- IDE:VS 2022社区版(中文版) DotNet Core 版本为NET8
创建项目
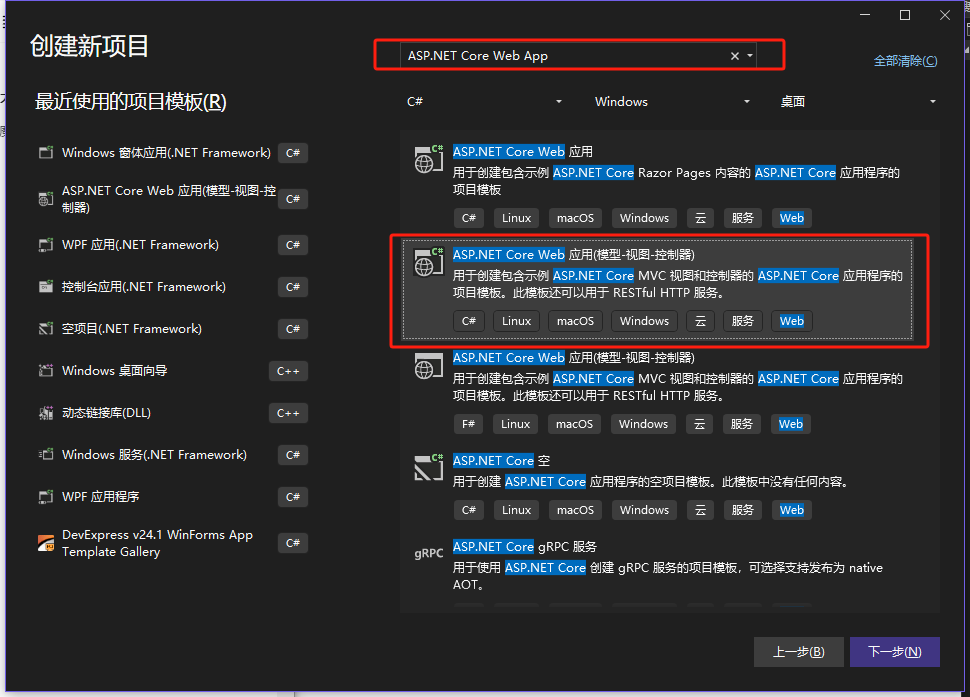
- 打开VS,依次点击工具栏文件按钮->新建->项目,选择ASP.NET Core Web 应用(模型-视图-控制器)
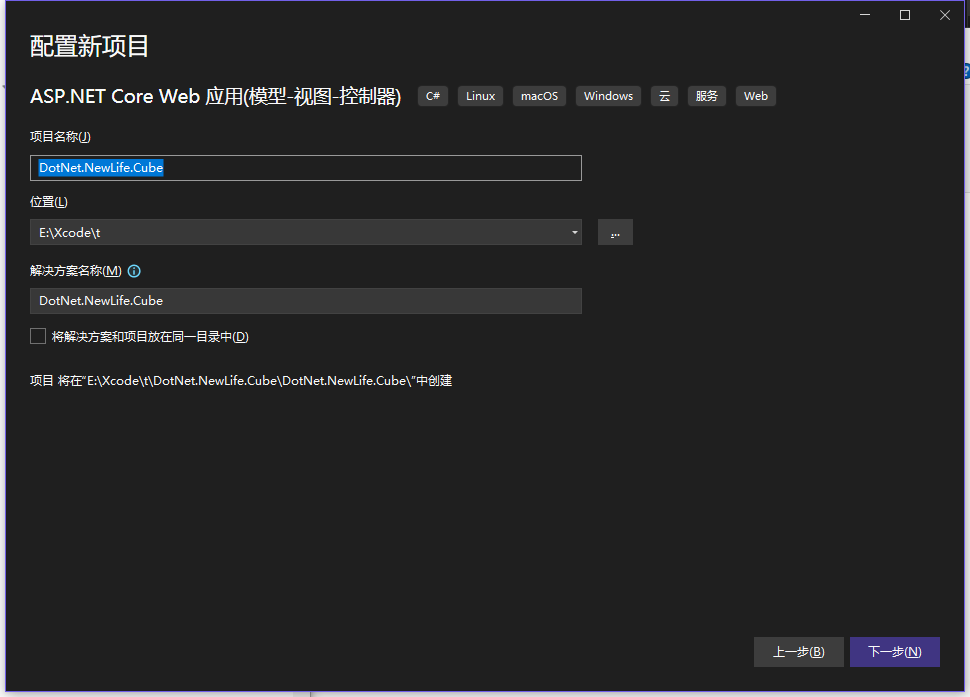
- 填写自己的项目名称,如:DotNet.NewLife.Cube,点击下一步
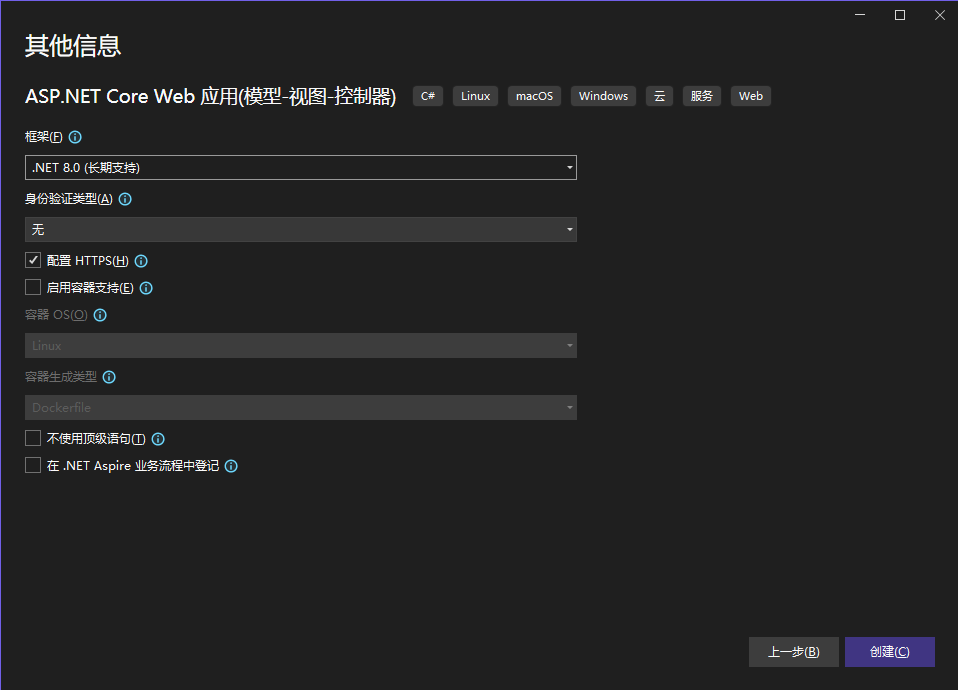
- 项目结构如下

安装并应用NewLife.Cube.Core
- 右键点击项目中依赖项->点击管理NuGet程序包->搜索框输入"NewLife.Cube.Core",选中搜索结果,点击安装。

修改Program.cs
注:使用皮肤需要在nuget下载安装对应的皮肤后,在后台系统设置》魔方设置》界面设置》主体样式里面可以进行切换。
这里会默认进入Admin路由,默认创建的MVC框架的内容不会变,路由没有进行禁止。
using NewLife.Cube;
//using NewLife.Cube.WebMiddleware;
//using NewLife.Cube.AdminLTE;
//using NewLife.Cube.ElementUI;
//using NewLife.Cube.LayuiAdmin;
//using NewLife.Cube.Metronic;
//using NewLife.Cube.Tabler;
//using NewLife.Cube.ElementUI;

var builder = WebApplication.CreateBuilder(args);

// Add services to the container.
// 引入星尘,设置监控中间件
//var star = builder.Services.AddStardust(null);
//TracerMiddleware.Tracer = star?.Tracer;

// 启用接口响应压缩
builder.Services.AddResponseCompression();
builder.Services.AddControllersWithViews();
// 启用魔方
builder.Services.AddCube();

var app = builder.Build();

// 加载魔方UI
//app.UseAdminLTE(app.Environment);
//app.UseTabler(app.Environment);
//app.UseMetronic(app.Environment);
//app.UseElementUI(app.Environment);
//app.UseMetronic8(app.Environment);
//app.UseLayuiAdmin(app.Environment);

// Configure the HTTP request pipeline.
if (!app.Environment.IsDevelopment())
{
    app.UseExceptionHandler("/Home/Error");
    // The default HSTS value is 30 days. You may want to change this for production scenarios, see https://aka.ms/aspnetcore-hsts.
    app.UseHsts();
}

app.UseHttpsRedirection();
app.UseStaticFiles();

// 使用魔方
app.UseCube(app.Environment);
// 配置魔方为首页,也就是默认打开魔方登录后台界面
app.UseCubeHome();
app.UseRouting();

app.UseAuthorization();

app.MapControllerRoute(
    name: "default",
    pattern: "{controller=Home}/{action=Index}/{id?}");


app.Run();
添加自己的页面
新建区域
- 首先新建区域School,手动创建文件夹Areas/School,在此文件夹创建区域类SchoolArea,填入以下内容。
using NewLife.Cube;
using NewLife;
using System.ComponentModel;

namespace DotNet.NewLife.Cube.Areas.School
{
    [DisplayName("教务系统")]
    public class SchoolArea : AreaBase
    {
        public SchoolArea() : base(nameof(SchoolArea).TrimEnd("Area")) { }

        static SchoolArea() => RegisterArea<SchoolArea>();
    }
}
新建实体
新建数据库实体类。新建文件夹Areas/School/Models,将实体类放在此文件夹。
使用XCode
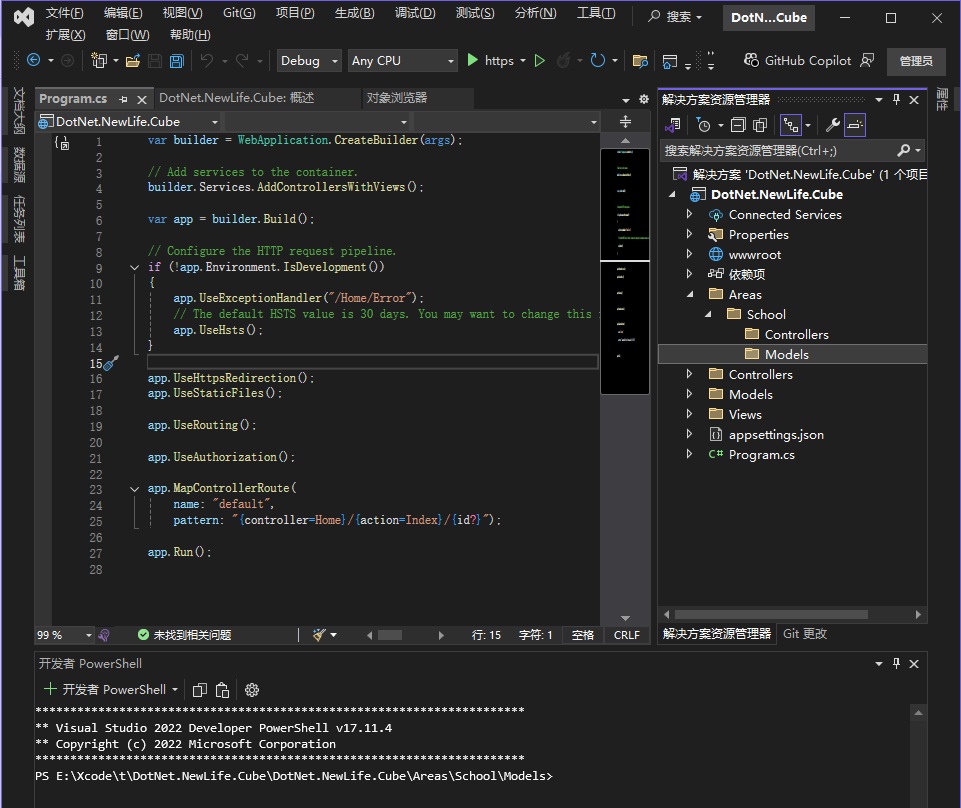
在终端中打开

运行xcode 会生成一个Model.xml示例

修改Model.xml 完毕后再次运行xcode就可以自动生成代码

Model.xml 修改后的内容
<?xml version="1.0" encoding="utf-8"?>
<EntityModel xmlns:xs="http://www.w3.org/2001/XMLSchema-instance" xs:schemaLocation="https://newlifex.com https://newlifex.com/Model202407.xsd" Document="https://newlifex.com/xcode/model" xmlns="https://newlifex.com/Model202407.xsd">
  <Option>
    <!--类名模板。其中{name}替换为Table.Name,如{name}Model/I{name}Dto等-->
    <ClassNameTemplate />
    <!--显示名模板。其中{displayName}替换为Table.DisplayName-->
    <DisplayNameTemplate />
    <!--基类。可能包含基类和接口,其中{name}替换为Table.Name-->
    <BaseClass>Entity</BaseClass>
    <!--命名空间-->
    <Namespace>peipei.Areas.School.Entity</Namespace>
    <!--输出目录-->
    <Output>Entity</Output>
    <!--是否使用中文文件名。默认false-->
    <ChineseFileName>True</ChineseFileName>
    <!--用于生成Copy函数的参数类型。例如{name}或I{name}-->
    <ModelNameForCopy />
    <!--带有索引器。实现IModel接口-->
    <HasIModel>True</HasIModel>
    <!--可为null上下文。生成String?等-->
    <Nullable>True</Nullable>
    <!--数据库连接名-->
    <ConnName>School</ConnName>
    <!--模型类模版。设置后生成模型类,用于接口数据传输,例如{name}Model-->
    <ModelClass>{name}Model</ModelClass>
    <!--模型类输出目录。默认当前目录的Models子目录-->
    <ModelsOutput>.\Models\</ModelsOutput>
    <!--模型接口模版。设置后生成模型接口,用于约束模型类和实体类,例如I{name}-->
    <ModelInterface>I{name}</ModelInterface>
    <!--模型接口输出目录。默认当前目录的Interfaces子目录-->
    <InterfacesOutput>.\Interfaces\</InterfacesOutput>
    <!--用户实体转为模型类的模型类。例如{name}或{name}DTO-->
    <ModelNameForToModel />
    <!--命名格式。Default/Upper/Lower/Underline-->
    <NameFormat>Default</NameFormat>
    <!--魔方区域显示名-->
    <DisplayName />
    <!--魔方控制器输出目录-->
    <CubeOutput />
  </Option>
  <Tables>
    <Table Name="Class" Description="班级" DbType="SqlServer">
      <Columns>
        <Column Name="Id" DataType="Int32" Identity="True" PrimaryKey="True" Description="编号" />
        <Column Name="TenantId" DataType="Int32" Map="XCode.Membership.Tenant@Id@Name@TenantName" Description="租户" />
        <Column Name="Name" DataType="String" Master="True" Description="名称" />
        <Column Name="Enable" DataType="Boolean" Description="启用" />
        <Column Name="GraduationDate" DataType="DateTime" Description="毕业时间" />
        <Column Name="Model" DataType="String" Length="20" Description="设备型号" />
        <Column Name="CreateUserID" DataType="Int32" Description="创建者" />
        <Column Name="CreateTime" DataType="DateTime" Description="创建时间" />
        <Column Name="CreateIP" DataType="String" Description="创建地址" />
        <Column Name="UpdateUserID" DataType="Int32" Description="更新者" />
        <Column Name="UpdateTime" DataType="DateTime" Description="更新时间" />
        <Column Name="UpdateIP" DataType="String" Description="更新地址" />
        <Column Name="Remark" DataType="String" Length="200" Description="备注" />
      </Columns>
    </Table>
    <Table Name="Student" Description="学生" DbType="SqlServer">
      <Columns>
        <Column Name="Id" DataType="Int32" Identity="True" PrimaryKey="True" Description="编号" />
        <Column Name="TenantId" DataType="Int32" Map="XCode.Membership.Tenant@Id@Name@TenantName" Description="租户" />
        <Column Name="ClassId" DataType="Int32" Map="Class@Id@$" Description="班级" Category="基本信息" />
        <Column Name="Name" DataType="String" Master="True" Description="名称" Category="基本信息" />
        <Column Name="Sex" DataType="Int32" Description="性别" Type="XCode.Membership.SexKinds" Category="基本信息" />
        <Column Name="Age" DataType="Int32" Description="年龄" Category="基本信息" />
        <Column Name="Mobile" DataType="String" Description="手机" Category="基本信息" />
        <Column Name="Address" DataType="String" Description="地址" Category="基本信息" />
        <Column Name="Enable" DataType="Boolean" Description="启用" Category="基本信息" />
        <Column Name="Avatar" DataType="String" ItemType="image" Description="头像" Category="基本信息" />
        <Column Name="Weight" DataType="Double" Scale="2" Description="体重。小数" />
        <Column Name="Amount" DataType="Decimal" Scale="3" Description="存款。小数" />
        <Column Name="CreateUserID" DataType="Int32" Description="创建者" Category="扩展信息" />
        <Column Name="CreateTime" DataType="DateTime" Description="创建时间" Category="扩展信息" />
        <Column Name="CreateIP" DataType="String" Description="创建地址" Category="扩展信息" />
        <Column Name="UpdateUserID" DataType="Int32" Description="更新者" Category="扩展信息" />
        <Column Name="UpdateTime" DataType="DateTime" Description="更新时间" Category="扩展信息" />
        <Column Name="UpdateIP" DataType="String" Description="更新地址" Category="扩展信息" />
        <Column Name="Remark" DataType="String" Length="200" Description="备注" Category="扩展信息" />
      </Columns>
      <Indexes>
        <Index Columns="TenantId,ClassId" />
        <Index Columns="ClassId" />
      </Indexes>
    </Table>
    <Table Name="Trade" Description="交易" ConnName="Bill" DbType="SqlServer">
      <Columns>
        <Column Name="Id" DataType="Int64" Identity="True" PrimaryKey="True" Description="订单编号" />
        <Column Name="TenantId" DataType="Int32" Map="XCode.Membership.Tenant@Id@Name@TenantName" Description="租户" />
        <Column Name="NodeId" DataType="Int32" Description="节点号" />
        <Column Name="Tid" DataType="String" Description="订单号" />
        <Column Name="Status" DataType="Int32" Description="状态" />
        <Column Name="PayStatus" DataType="Int32" Description="是否支付" />
        <Column Name="ShipStatus" DataType="Int32" Description="是否发货" />
        <Column Name="CreateIPReceiverPhone" DataType="String" Description="收货人电话" />
        <Column Name="ReceiverMobile" DataType="String" Description="收货人手机号" />
        <Column Name="ReceiverState" DataType="String" Description="收货省" />
        <Column Name="ReceiverCity" DataType="String" Description="收货人区" />
        <Column Name="ReceiverDistrict" ColumnName="Receiver_District" DataType="String" Description="收货区" />
        <Column Name="ReceiverAddress" DataType="String" Description="收货地址" />
        <Column Name="BuyerName" DataType="String" Description="买家昵称" />
        <Column Name="Created" DataType="Int32" Description="创建时间" />
        <Column Name="Modified" DataType="Int32" Description="是否发送过" />
        <Column Name="IsSend" DataType="Int32" Description="更新者" />
        <Column Name="ErrorMsg" DataType="String" Length="200" Description="错误原因" />
      </Columns>
      <Indexes>
        <Index Columns="TenantId,NodeId" />
        <Index Columns="NodeId" />
      </Indexes>
    </Table>
  </Tables>
</EntityModel>
新建控制器
- 新建文件夹Areas/School/Controllers,新建ClassController、StudentController两个控制器,分别填入以下内容。
using DotNet.NewLife.Cube.Areas.School.Entity;

using Microsoft.AspNetCore.Mvc;
using Microsoft.AspNetCore.Mvc.RazorPages;

using NewLife.Cube;
using NewLife.Log;

using NewLife.Web;

using System.ComponentModel;
using System.Reflection;
using System.Security.Claims;

using XCode.Membership;

namespace DotNet.NewLife.Cube.Areas.School.Controllers
{
    [SchoolArea]
    [DisplayName("班级")]
    public class ClassController : EntityController<Class, ClassModel>
    {
        private readonly ITracer _tracer;

        public ClassController(IServiceProvider provider)
        {

            PageSetting.EnableTableDoubleClick = true;

            _tracer = provider?.GetService<ITracer>();
        }

        protected override IEnumerable<Class> Search(Pager p)
        {
            using var span = _tracer?.NewSpan(nameof(Search), p);

            var id = p["Id"].ToInt(-1);
            if (id > 0)
            {
                var entity = Class.FindById(id);
                return entity == null ? new List<Class>() : new List<Class> { entity };
            }

            var start = p["dtStart"].ToDateTime();
            var end = p["dtEnd"].ToDateTime();

            return Class.Search(start, end, p["Q"], p);
        }
    }
}
using Microsoft.AspNetCore.Mvc;
using NewLife.Cube.ViewModels;
using NewLife.Cube;
using System.ComponentModel;
using System.Reflection;
using XCode.Membership;
using NewLife.Web;
using DotNet.NewLife.Cube.Areas.School.Entity;
namespace DotNet.NewLife.Cube.Areas.School.Controllers
{
[SchoolArea]
[DisplayName("学生")]
public class StudentController : EntityController<Student, StudentModel>
{
static StudentController()
{
ListFields.RemoveField("CreateUserID");
ListFields.RemoveField("UpdateUserID");
//FormFields
}
protected override Student Find(Object key)
{
return base.Find(key);
}
protected override IEnumerable<Student> Search(Pager p)
{
return base.Search(p);
//var classid = p["classid"].ToInt();
//return Student.Search(null,p);
}
public override ActionResult Index(Pager p = null)
{
return base.Index(p);
}
}
}页面修改
- 此时运行,一切正常,可看到如下页面。

- 比如修改学生主页,则新建文件夹Areas/School/Views/Student/,新建文件_List_Data.cshtml。填入以下内容。
@using NewLife;
@using NewLife.Cube
@using NewLife.Web;
@using XCode;
@using XCode.Configuration;
@using XCode.Membership
@{
    var fact = ViewBag.Factory as IEntityFactory;
    var page = ViewBag.Page as Pager;
    var fields = ViewBag.Fields as List<FieldItem>;
}
<table class="table table-bordered table-hover table-striped table-condensed">
    <thead>
        <tr>
            <th class="text-center hidden-md hidden-sm hidden-xs"><a href="@Html.Raw(page.GetSortUrl("ID"))">编号</a></th>
            <th class="text-center"><a href="@Html.Raw(page.GetSortUrl("ClassID"))">班级2</a></th>
            <th class="text-center"><a href="@Html.Raw(page.GetSortUrl("Name"))">名称3</a></th>
            <th class="text-center"><a href="@Html.Raw(page.GetSortUrl("Sex"))">性别4</a></th>
            <th class="text-center"><a href="@Html.Raw(page.GetSortUrl("Age"))">年龄5</a></th>
            <th class="text-center"><a href="@Html.Raw(page.GetSortUrl("Mobile"))">手机</a></th>
            <th class="text-center"><a href="@Html.Raw(page.GetSortUrl("Address"))">地址</a></th>
            <th class="text-center"><a href="@Html.Raw(page.GetSortUrl("CreateTime"))">创建时间</a></th>
            <th class="text-center"><a href="@Html.Raw(page.GetSortUrl("CreateIP"))">创建地址</a></th>
            <th class="text-center"><a href="@Html.Raw(page.GetSortUrl("UpdateTime"))">更新时间</a></th>
            <th class="text-center"><a href="@Html.Raw(page.GetSortUrl("UpdateIP"))">更新地址</a></th>
            <th class="text-center"><a href="@Html.Raw(page.GetSortUrl("Remark"))">备注</a></th>
            @if (this.Has(PermissionFlags.Detail, PermissionFlags.Update, PermissionFlags.Delete))
            {
                <th class="text-center">操作</th>
            }
        </tr>
    </thead>
    <tbody>
        @foreach (var entity in Model)
        {
            <tr>
                <td class="text-center hidden-md hidden-sm hidden-xs">@entity.ID</td>
                <td>@entity.ClassName</td>
                <td>@entity.Name</td>
                <td class="text-center">@entity.Sex</td>
                <td class="text-right">@entity.Age.ToString("n0")</td>
                <td>@entity.Mobile</td>
                <td>@entity.Address</td>
                <td>@Utility.ToFullString(entity.CreateTime, "")</td>
                <td>@entity.CreateIP</td>
                <td>@Utility.ToFullString(entity.UpdateTime, "")</td>
                <td>@entity.UpdateIP</td>
                <td>@entity.Remark</td>
                @if (this.Has(PermissionFlags.Detail, PermissionFlags.Update, PermissionFlags.Delete))
                {
                    <td class="text-center">
                        @await Html.PartialAsync("_List_Data_Action", (Object)entity)
                    </td>
                }
            </tr>
        }
    </tbody>
</table>
XCode工具编译和使用


双击xcodetool.exe 理论上会自动注册到dot net tool里面

Execute(dotnet tool list -g)
Execute(dotnet tool install xcodetool -g)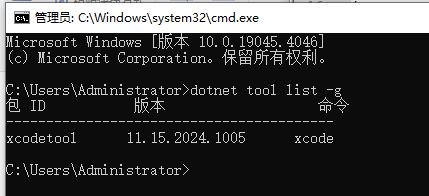
使用xcode命令即可调用。第一次执行会下载一个model.xml示例,修改完毕后。再次执行会生成代码。
注意:有的时候电脑会间歇性抽风,emm这是一个很蛋疼的问题,虽然重启会好。这里再提供一个解决方法将XCodeTool.exe 所在目录添加到系统path环境里面即可。
关于数据库相关
关于数据库连接库
如果框架没有自动拉取到数据库依赖DLL可以使用nuget的方式:
会出现这样的情况

在nuget 上搜索 Xcode. 进行手动安装

关于数据库字段
appsettings.json相关
{
  "Logging": {
    "LogLevel": {
      "Default": "Information",
      "Microsoft.AspNetCore": "Warning"
    }
  },
  "AllowedHosts": "*",
  "Urls": "http://*:8080;https://*:8081",
  "StarServer": "http://star.newlifex.com:6600",
  "ConnectionStrings": {
    "Membership": "Data Source=192.168.1.106;Initial Catalog=peipei;user=sa;password=landv;provider=mssql",
    "School": "MapTo=Membership",
    "Bill": "MapTo=Membership",
    "Log": "MapTo=Membership"
  }
}其中MapTo=Membership 为等同于Membership 的配置。
Membership和Log 是框架需要的,如果这里不进行配置数据库连接,就会自动创建sqlite。

这里有多少个,就需要配置多个连接,如果不配置就自动创建为sqlite。
下面是默认sqlite配置字符串
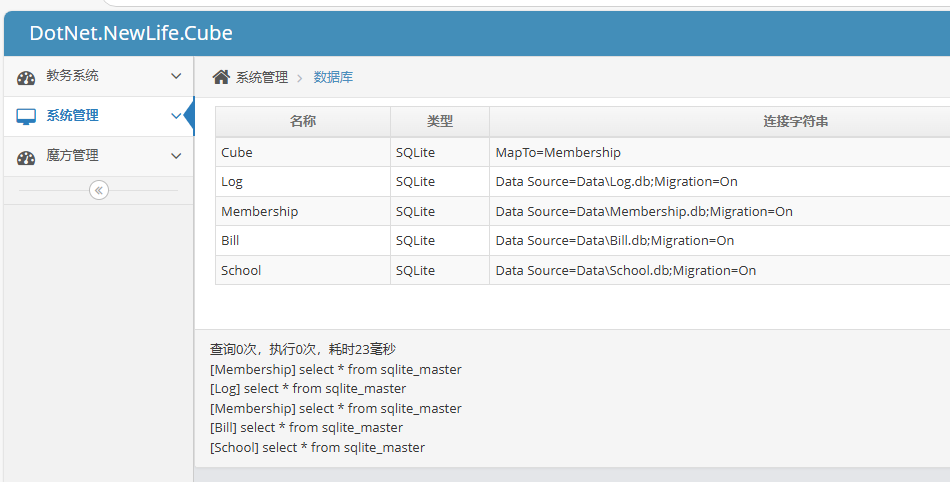
数据库连接字符串示例
  "ConnectionStrings": {
    "mssql": "Data Source=192.168.1.106;Initial Catalog=peipei;user=sa;password=landv;provider=mssql",
    "mssql2": "Data Source=.;Initial Catalog=master;Integrated Security=True;provider=mssql",
    "Oracle": "Data Source=Tcp://127.0.0.1/ORCL;User Id=scott;Password=tiger;provider=oracle",
    "Oracle2": "Data Source=orc;User ID=admin;Password=admin;provider=oracle",
    "sqlite": "Data Source=test.db;provider=sqlite",
    "MySql": "Server=127.0.0.1;Port=3306;Database=mysql;Uid=root;Pwd=root;provider=mysql",
    "PostgreSQL": "Server=.;Database=master;Uid=root;Pwd=root;provider=PostgreSQL",
    "Membership": "Data Source=Membership.db;provider=sqlite"
  }